![[Hierarchy Diagram]](HeliHier.GIF)
Virtual environments are made up of a number of objects with various attributes and behaviors. The building step in making a virtual environment involves organizing the world into objects and then constructing the attributes of the objects.
Some of the kinds of attributes that virtual objects may possess are:
An object's position & orientation specifies where it is in the virtual world, and what direction it is facing. Geometry describes an object's structure in 3D space and how it will look when viewed from different perspectives. The material properties of an object specifies its' appearance by describing what it is 'made' of: Whether it is shiny metal, dull like clay, or translucent like glass. One possible material attribute involves 'texture maps' which are pictures that have been mapped on to the surface of the object. The sounds are digital audio samples like short segments from a compact disk. Lighting specifies the sources of light in the virtual world.
Rather than deal with an unstructured mass of graphics and sound and
data, we divide the virtual world into objects. It is important not to
confuse the concept of 'object' with the attribute of 'geometry'.
Although individual elements of geometry in a 3D model are often refered
to as 'objects', geometry is only one aspect of a virtual
object. In fact, some objects may not even have geometry associated with
them. An object is like a box to put pieces of data into: graphics, sound,
3D models, numbers, and even other objects. An object that contains other
objects is called an object hierarchy.
Object hierarchies make it easier to make changes to the virtual environment.
A helicopter is made of a buch of different parts: a fusilage, two propellers,
binking lights, etc. If we want to make the helicopter fly, rather than
move each part individually, it is easier to move just one object-- the
helicopter-- and have the other parts move along with it. A diagram of
the helicopter object hierarchy might look like the following:
The helicopter object does not have any geometry of its own, but it
does contain other objects that do have geometry. Each of these objects
have their own name. This way, if we want to spin just the propeller1 object,
then we can address the 'spin' instruction to the propeller1
object. If we want to blink all of the lights, then we might send a 'blink'
instruction to the 'Lights' object, telling it (and all of
the objects it contains) to blink.
We built the object hierarchy for Global Warming World using the dVISE
software from Division, Inc. A simplified object hierarchy diagram of Global
Warming World appears below:
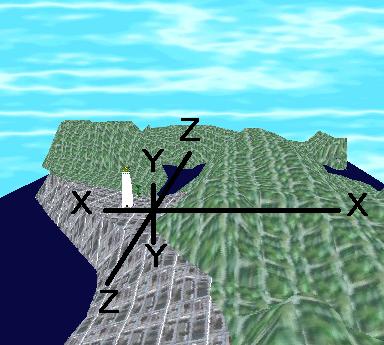
The position of an object is specified by X, Y, and Z coordinates. By convention, the Y direction is usually the vertical direction. In Global Warming World X direction is East-West, the Y direction is Up-Down and the Z direction is North-South. The orientation of an object is specified by three angles called Euler angles (after Leonhard Euler the Swiss Mathematician). Each of these correspond to rotations about each of the X, Y, and Z coordinate axes: The angle of rotation about the X axis is called Pitch. Rotations about the Y axis is called Yaw, and the rotation about the Z axis is called Roll.
An object's geometry describes its' structure in 3D space and how it will look when viewed from different perspectives. The process of building an object's geometry is called modeling. Modeling requires special modeling software that can save in formats that are compatible with your VR system.
|
Geometry Format |
|||||
| Modeling Software | Platform | DXF | VRML | 3DS | OBJ |
| Alias|Wavefront Studio | Silicon Graphics | X | X | X | |
| Autodesk 3D Studio | Windows | X | X | X | |
| Extreme 3D | Mac & Windows | X | |||
| FormZ | Mac & Windows | X | X | X | |
| Strata Studio Pro | Mac | X | X | ||
| Virtus Walkthrough Pro | Mac & Windows | X | X | ||
There are a few things to keep in the back of your mind while building the objects of the world. First, remember that complex objects can almost always be described as a combination of simpler objects. It is easier to build a simple object once and use it often than build a complex object and then determine which components can be reused. Second, visualize where each object will appear in the final world to help you build it right the first time. This will also help when putting the world together.
Since most 3D modeling software uses a 2D computer screen, a single view of the object is not sufficient to completely describe it. For example, a cube and a rectangular prism may look exactly the same from the side. A three dimensional object can be completely described with three views: for example, top, front, and side. Most modeling software presents you with these standard views.
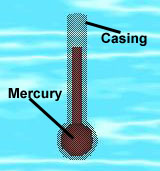
As an example of a simple object drawn with three views, consider the thermometer we use in Global Warming World to measure air and water temperature. The thermometer is really comprised of two smaller objects: Mercury and a casing. The mercury is two basic objects: Sphere and cylinder.
We could design the mercury in a number of different ways. We came up with a design that only requires the use of 24 triangles. The three views of the mercury cylinder look like this:
The Top view details the six-sidedness of our object. The Front view demonstrates the relationship of height to width. And, the Side view shows us the fact that our design is symmetrical. Most importantly, the three views show us each point of the object at least twice. If the bottom were different than the top, the front and side views would make that obvious. If the side was different from the front, the top view would point out those differences for us. This is a simple object, but with a very common shape. In fact, we will use the same object for our Rain Meter except we will color the rain meter blue instead of red.
As for the casing, that object will look like a faceted sphere with a long tube coming out of it. It will be almost twice as wide as our mercury, and just a little bit longer. We'll reuse the casing also for our rain meter.
We mentioned it was important to consider the whole world when designing each object. We need a scale for our objects so they will be the right size relative to all other objects. Choose a scale that makes sense. For an athletic stadium, you might choose a scale of 1 unit equaling 1 meter, where as for a galaxy, you would choose a larger scale. Perhaps, each unit would represent 1000 light years. For Global Warming World, we chose 1 unit to be a quarter-mile. This scale seemed reasonable for a virtual Seattle. Remember that an object's scale in real life need not be the same in a virtual environment. We chose to make our thermometer a tenth of a mile tall so it would be easier to read! This is especially necessary since, when you are in the Global Warming World you are Godzilla-like in stature (to make it easier for you to get around).
As an example of starting from a book or magazine, consider our landscape of Seattle. We started with a topographical map we found in a book. Maps often make good top views of landscapes. We then traced the map and scanned it into the computer using a flatbed scanner. We could have used graph paper if we didn't have access to a scanner, but we would then need to enter the coordinates into the computer by hand. Each contour curve on the map corresponds to a different height. We used the computer's modeling software to move each curve to the appropriate height, and then built the curves into a single surface to make the landform for Seattle. Since we wanted to be able to easily assign different material properties to different parts of Seattle, we divided the landform into commercial, residential and underwater areas, and made separate surfaces of each.
Modeling software usually also provides a 'perspective' view that you can move around to look at from any direction. This is the view that we use to test out our objects. Because of the two-dimensionality of the computer screen, it is difficult to accurately move an object in X, Y, and Z directions at the same time. Instead, we use one view at a time to be sure we are exactly where we want to be.
Creating an object from scratch using modeling software is easier once we have determined its dimensions. We start with one view and draw it from our specifications. In the case of our mercury object, we would draw the top view onto the grid provided in the top view pane of the modeling software. We can draw the points and then combine them with line segments. Or, we can just draw the lines. We would then look at the front view (which already shows our work from the top view) and copy the object that is there and move it to become our bottom. Then, using the front and side views, we would connect the six points of the top object to the six points on the bottom object. Our mercury object is complete. We can view it from the combined view. We can spin it, move away from it, and tilt it as we need to. We want to view the object as any participant could in order to make sure it will still look like the mercury in a thermometer. We make changes to the object in any view as we see fit and all other views will be immediately updated with our changes. When we are done, we save the object in a format we can use in our virtual world. It is now a computer file ready for use at any time we need the object or want to use it as part of a complex object.
If you don't wish to build all of the objects for a virtual world, often you can find useful models on the net that are in the public domain (and, therefore, available for free). Some places that archive 3D models are: 3D Cafe ,Avalon ,ViewPoint, and ETOPO If the file format is not compatible with your modeling software, look for conversion programs that will convert a file to a format you can use. Often the conversion programs you need will also be in the public domain.
The material properties of an object describes its surface characteristics and how it interacts with light. The "material" the object is "made" of is specified by its color, shading, specularity, transparency, and texture.
You specify a color by mixing portions of the basic colors for light: red, green, and blue. Shading lets us smooth over the fact that we are only using a limited number of polygons to represent a smooth surface. Specularity is the shininess of the object. Very "specular" objects have small, bright glints of light on their surfaces (as opposed to objects of low specularity which reflect diffusely). Objects with different transparencies behave a little like colored glass.

Textures can be created from scratch with 2D computer graphics software or from an existing picture or scanned image. These images are then "painted" onto the surface of an object to make them appear to have greater complexity than their geometry would indicate. Textures can be used for such things as adding wood-grain to objects, a façade to a building, or leaves and branches to a tree.
For example, these textures were created for Global Warming World:
Millions of triangles would be required to create all the detail present in these pictures using only geometry.
Unfortunately, Global Warming World does not make extensive use of sound because our development system has only rudimentary sound capabilities. We did choose some background music for this world (which was not digitized or stored on a computer, only played back on a CD player): the music from the film Koyaanisqatsi by Phillip Glass.
Sound can use up memory very quickly. Stereo CD-quality sound uses 175 kilobytes for each second of digitized sound. In order to conserve memory, it is often useful to chose sounds which have repetition. This way you can specify loops to play and save memory.
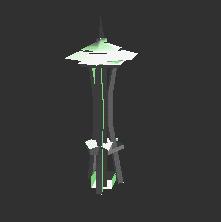
Lights are defined by their type, color, and intensity. Lights can be point sources (like a light bulb), directional (like the rays from the sun), spotlights (like a spotlight during live theater), ambient (everywhere of equal intensity), or a variety of other types. Lighting design for VR is quite similar to lighting design for the cinema or theater. For Example, a point light high above the world gives the Space Needle a moon-lit appearance.
![]()
![]()