"Extending VRML 2 with Java," Vol. 1, Issue 1, p. 42
![]() 5 of 6
5 of 6 ![]()
7. Follow the architecture of the EAI to provide attributes in your class in step 4 which map to the DEF nodes of step 3.
 For
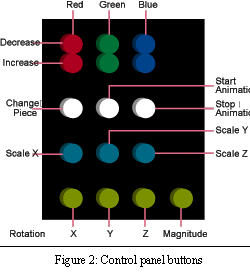
Kaleidoscope world, you need 14 Node type attributes, some of which can
take advantage of array indexing. The variable named root[] provides an
indexed Node for each shape in the kaleidoscope. The variable named shape[]
provides an indexed Node for the shape of each root[] node. The next six
Node arrays create attributes for the kaleidoscope nodes, color palette
nodes, shape palette nodes, scale control nodes and rotation control nodes.
For example, the rotation controls are connected to the K class through
the line:
For
Kaleidoscope world, you need 14 Node type attributes, some of which can
take advantage of array indexing. The variable named root[] provides an
indexed Node for each shape in the kaleidoscope. The variable named shape[]
provides an indexed Node for the shape of each root[] node. The next six
Node arrays create attributes for the kaleidoscope nodes, color palette
nodes, shape palette nodes, scale control nodes and rotation control nodes.
For example, the rotation controls are connected to the K class through
the line:
Node snsrro[] = {null,null,null,null};
The last six Node attributes set up attributes for the color controls.
Each attribute connects to the VRML 2 file through the getNode() method of the browser object. For example, in the init() method of the K class, you can connect the increase green color control to its appropriate Transform node using the line:
snsrg = browser.getNode("TSCG");
8. Add an additional attribute for changes you want to make to each attributes in step 7 (translation, rotation, scale, color, etc.).
For Kaleidoscope world I decided to package each change of translation, rotation, scale or color in a string which follows the syntax of valid VRML 2 nodes. So, instead of changing each design feature separately, I name removeChildren[] and addChildren[] attributes to allow me to remove VRML nodes and replace them with new ones in a single line of code. Both are of type EventInMFNode. The EAI provides types for changing translation, rotation, scale or color one at a time as well without having to create VRML 2 syntax strings.
9. Add an additional attribute for each attribute in step 7 you want to be mouse-click aware.
You must also create a separate EventOutSFTime type attribute to enable each touch sensor you want users to be able to use in your world. These attributes connect to touch enabled timers in the init() method of the K class as with the line tTimeg = (EventOutSFTime) snsrg.getEventOut(touchTime); which connects the touch sensor from the green increase intensity control to its appropriate timer.
10. Create an event handling routine for each attribute you specify in step 9.
You connect your time attributes to your event handling routines through the use of an integer as with the line tTimeg.advise(this, new Integer(25));
Then, in the callback() method of your K class (all EAI applications must override this exact callback() method in order to work correctly), you create a routine that will run each time the appropriate touch sensor is activated. In the case of the green intensity control, the event handling routine appears as in the following. Assuming you have assigned the active touch sensor the value 25, the objgreen variable increases by .1, which makes the node being designed greener (if, of course, the node is not already at maximum green intensity):
else if (whichNum.intValue()==25) {
objgreen = objgreen + .1;
if(objgreen>1) {objgreen = 1;}
}
![]() 5 of 6
5 of 6 ![]()
Copyright 1998 by SYS-CON Publications, Inc.
VRMLJournal.com