The SimpleTest Program
The file we will be looking at is simpleTest.c (or simple.c). This program simply consists of a main routine and several graphics drawing routines.
The functions which correspond to the six application steps previously described (see here) are shown in Table 1. The functions corresponding to steps 2 through 5 are called within the mainLoop function.
| ARToolKit Step | Functions |
| 1. Initialize the application | init |
| 2. Grab a video input frame | arVideoGetImage (called in mainLoop) |
| 3. Detect the markers | arDetectMarker (called in mainLoop) |
| 4. Calculate camera transformation | arGetTransMat (called in mainLoop) |
| 5. Draw the virtual objects | draw (called in mainLoop) |
| 6. Close the video capture down | cleanup |
Table 1: Function calls and code that corresponds to the ARToolKit applications steps.
main(int argc, char *argv[])
{
    init();
    arVideoCapStart();
    argMainLoop( NULL, keyEvent, mainLoop );
}
The init initialization routine contains code for starting the video capture, reading in the marker and camera parameters, and setup of the graphics window. This corresponds to step 1 in the development method. Next, we enter in the real-time state, with a call to the video starting function arVideoCapStart. Following, the argMainLoop function is called which starts the main program loop and associates the function keyEvent with any keyboard events and mainLoop with the main graphics rendering loop. The definition of argMainLoop is contained in the file gsub.c.
At first, the video path is opened and the video image size found:
/* open the video path */
if( arVideoOpen( vconf ) < 0 ) exit(0);

/* find the size of the window */
if( arVideoInqSize(&xsize, &ysize) < 0 ) exit(0);
printf("Image size (x,y) = (%d,%d)\n", xsize, ysize);
The variable vconf contains the initial video configuration and is defined at the top of simple.c. In function of your platform the content can be really different: see video configuration page. For each platform a default string is defined, that generally open the first available video stream in your architecture.
After, we need to initialize the ARToolKit application parameters. The key parameters for an ARToolKit application are:
- the patterns that will be used for the pattern template matching and the virtual objects these patterns correspond to.
- the camera characteristics of the video camera being used.
So, the camera parameters are read in with the default camera parameter file name Data/camera_para.dat:
/* set the initial camera parameters */
if( arParamLoad(cparaname, 1, &wparam) < 0 ) {
    printf("Camera parameter load error !!\n");
    exit(0);
}
Next, the parameters are transformed for the current image size, because camera parameters change depending on the image size, even if same camera is used.
arParamChangeSize( &wparam, xsize, ysize, &cparam );
The camera parameters are set to those read in, the camera parameters printed to the screen:
arInitCparam( &cparam );
printf("*** Camera Parameter ***\n");
arParamDisp( &cparam );
After that we read the pattern definition with the default pattern file Data/patt.hiro:
if( (patt_id=arLoadPatt(patt_name)) < 0 ) {
    printf("pattern load error !!\n");
    exit(0);
}
patt_id is an identified pattern identification.
Finally a graphics window is opened:
/* open the graphics window */
argInit( &cparam, 1.0, 0, 0, 0, 0 );
The second argument of argInit defined a zoom function, set to 1.0 for matching video image format, set to 2.0 for double the size (e.g have a VGA AR display with a 320x240image input).
First a video frame is captured using the function arVideoGetImage:
/* grab a video frame */
if( (dataPtr = (ARUint8 *)arVideoGetImage()) == NULL ) {
    arUtilSleep(2);
    return;
}
The video image is then displayed on screen. This can either be an unwarped image, or an image warped to correct for camera distortions. Warping the image produces a more normal image, but can result in a significant reduction in video frame rate. In this example the image is non-unwarped:
argDrawMode2D();
argDispImage( dataPtr, 0,0 );
Then the function arDetectMarker is used to search the video image is searched for squares that have the correct marker patterns:
if( arDetectMarker(dataPtr, thresh, &marker_info, &marker_num) < 0 ) {
    cleanup();
    exit(0);
});
The number of markers found is contained in the variable marker_num, while marker_info is a pointer to a list of marker structures containing the coordinate information and recognition confidence values and object id numbers for each of the markers. The marker_info structure is detailled in the API documentation.
At this moment, The video image have been displayed and analyzed. So we don't need to use it more: we can ask the frame grabber to start a new grabbing in the same time we operates new functions. For this you have just to call arVideoCapNext:
arVideoCapNext();
Remark: when you called this function, using the last video image buffer can produce a bad result (dependant of your plaform). Be sure that you finish to deal with the video image buffer.
Next, all the confidence values of the detected markers are compared to associate the correct marker id number with the highest confidence value:
/* check for object visibility */
k = -1;

for( j = 0; j < marker_num; j++ ) {
    if( patt_id == marker_info[j].id ) {
        if( k == -1 ) k = j;
        else if( marker_info[k].cf < marker_info[j].cf ) k = j;
    }
}

if( k == -1 ) {
    argSwapBuffers();
    return;
}
The transformation between the marker cards and camera can then be found by using the arGetTransMat function:
/* get the transformation between the marker and the real camera */
arGetTransMat(&marker_info[k], patt_center, patt_width, patt_trans);
The real camera position and orientation relative to the marker object i are contained in the 3x4 matrix, patt_trans.
Finally, the virtual objects can be drawn on the card using the draw function:
draw();
argSwapBuffers();
Remark: a simple optimization step is done if no pattern are found (k==-1), we can directly swap the buffer without a call to draw and return:
if( k == -1 ) {
    argSwapBuffers();
    return;
}
argDrawMode3D();
argDraw3dCamera( 0, 0 );
glClearDepth( 1.0 );
glClear(GL_DEPTH_BUFFER_BIT);
glEnable(GL_DEPTH_TEST);
glDepthFunc(GL_LEQUAL);
You need after that to convert the computed transformation (3x4 matrix) to an openGL format (array of 16 values), using the function call argConvGlpara. These sixteen values are the position and orientation values of the real camera, so using them to set the position of the virtual camera causes any graphical objects to be drawn to appear exactly aligned with the corresponding physical marker.
/* load the camera transformation matrix */
argConvGlpara(patt_trans, gl_para);
glMatrixMode(GL_MODELVIEW);
glLoadMatrixd( gl_para );
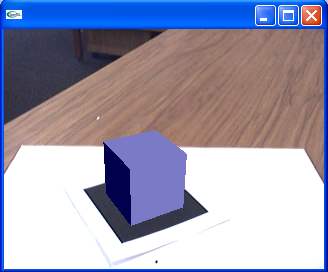
The virtual camera position is set using the OpenGL function glLoadMatrixd(gl_para).The last part of the code is the rendering of 3D object, in this example a cube with a blue color under a white color light:
glEnable(GL_LIGHTING);
glEnable(GL_LIGHT0);
glLightfv(GL_LIGHT0, GL_POSITION, light_position);
glLightfv(GL_LIGHT0, GL_AMBIENT, ambi);
glLightfv(GL_LIGHT0, GL_DIFFUSE, lightZeroColor);
glMaterialfv(GL_FRONT, GL_SPECULAR, mat_flash);
glMaterialfv(GL_FRONT, GL_SHININESS, mat_flash_shiny);
glMaterialfv(GL_FRONT, GL_AMBIENT, mat_ambient);
glMatrixMode(GL_MODELVIEW);
glTranslatef( 0.0, 0.0, 25.0 );
glutSolidCube(50.0);
And to finish, you reset to default some OpenGL variables:
glDisable( GL_LIGHTING );
glDisable( GL_DEPTH_TEST );
The steps mentioned above occur every time through the main rendering loop. While the program is running mouse events are handled by the mouseEvent function and keyboard events by the keyEvent function.
arVideoCapStop();
arVideoClose();
argCleanup();
This is accomplished by using the arVideoCapStop, arVideoClose and argCleanup routines.
You can compile this program and run it!
One limitation of this program is that used only the Hiro pattern: it seems really interesting to use others patterns or more than one! We will describe how do that in the next section.