printf("%f %f %f\n",patt_trans[0][3],patt_trans[1][3],patt_trans[2][3]);
Recompile and start the program. Look at the output values. If you move the marker to the left, the first value increases, move to the top the second value decreases and move to the front the last value increases also. This is the Coordinate System (CS) used by ARToolKit:
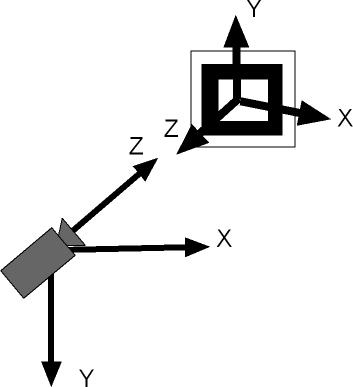
Figure 1: ARToolKit Coordinate Systems (Camera and Marker)
The output values correspond to these coordinate systems. The marker CS has the same orientation of the OpenGL CS, so any transformation applied to the object associated with the marker needs to respect OpenGL transformation principles. For example, if you don't want to display the cube at the center of the marker CS, but sitting on the top you would need to replace:
glTranslatef(0.0,0.0,25.0);
with
glTranslatef(0.0,20.0,25.0);
And you will be obtain:
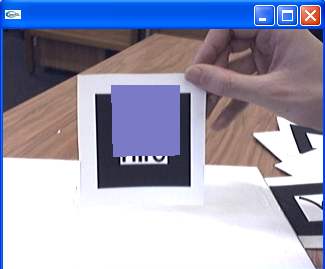
Figure 2: simpleTest with a translation of virtual object
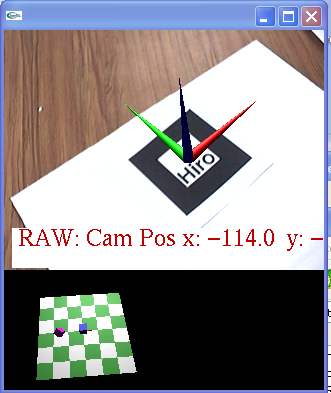
It's also more intuitive to consider the marker static and the real camera moving. That is to say, we want to obtain the position of the camera in the marker's coordinate system. Go to the bin directory and run exview. This program will display the view shown in Figure 3, and show text output of the camera position in the marker CS. Another view presents a 3D model of the camera and the marker.
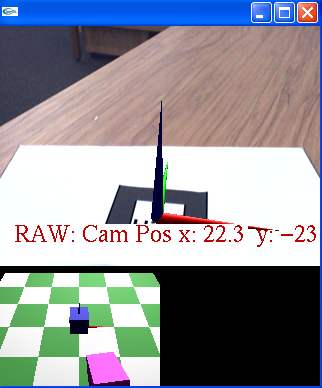
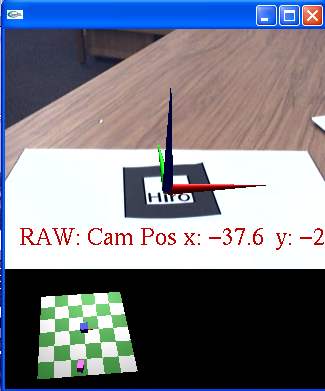
Figure 3: exview screenshot. in the top image, you can see the marker CS (Blue Z, Green Y, Red X). The lower picture shows the camera position in the marker coordinate system.
You can move your mouse in the 3D external view and manipulate it to feel this relation (other examples in Figure 4).
 |
 |
Open exview.c from the examples/exview directory. Look at the method getResultRaw:
if( arGetTransMat(marker_info, target_center,
    target_width, target_trans) < 0 ) return;

if( arUtilMatInv(target_trans, cam_trans) < 0 ) return;

sprintf(string," RAW: Cam Pos x: %3.1f y: %3.1f z: %3.1f",
    cam_trans[0][3], cam_trans[1][3], cam_trans[2][3]);
You will see the same call of arGetTransMat and a call of arUtilMatInv that give you the inverted position. The relationship between Marker and Camera is important, and switching between them gives the possibility to work with multiple coordinate systems. Based on these coordinate system, you can also obtain the transformation between the different coordinate systems. Open relationTest.c in examples/relation directory. Like simplem you can see multiple objects. The main difference is this added code:
if( object[0].visible >= 0 && object[1].visible >= 0 ) {

    double wmat1[3][4], wmat2[3][4];

    arUtilMatInv(object[0].trans, wmat1);
    arUtilMatMul(wmat1, object[1].trans, wmat2);

    for( j = 0; j < 3; j++ ) {

        for( i = 0; i < 4; i++ ) printf("%8.4f ", wmat2[j][i]);

        printf("\n");
    }

    printf("\n\n");
}
This code computes the relative transformation between two markers. object[0].trans is the transformation of marker 1 in the camera CS. object[1].trans is the transformation of the marker 2 in the camera CS. So the inversion of object[0].trans multiplied by object[1].trans will give you the transformation of marker 2 in marker 1 CS. Run the program and put the markers in these position:
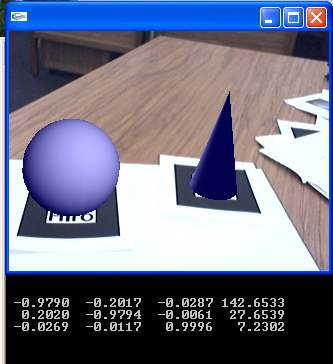
Figure 5: relationTest (rendering view and console output).
The last display column gives the relative transformation of marker 2 in marker 1 CS. The cone is on the left of the sphere (142mm in X direction), above marker 1 (27 mm on Y direction), and they are nearly in the same plane (7mm on Z direction). Try to move marker 1 and marker 2 and observe the output values to understand these relationships.
Try to do the reverse operation by modifying the code of relationTest (relative transformation of marker 1 in marker 2 CS).
In the next tutorial we will see another kind of transformation between markers by "associating" multiple markers in the same CS.