| Introduction | This tutorial will help you become acquainted with the techniques necessary to assign different materials to the same objects, for example different facades of a building can be assigned to an object using the Multi/Sub-Object material type. For this tutorial we will use a simple pasta box to illustrate the technique. |
 |
|
| Geometry First we create a box with a length, width and height of: 3.0", 5.1", 6.7". Open the Create command panel, select the first icon for geometry and under the Standard Primitives create a box with these dimensions. |
 |
|
|
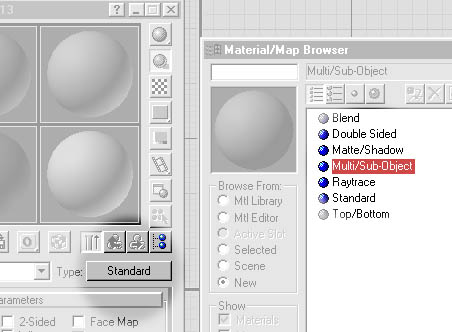
| Material Definition Open the Material Editor and select one of the Sample Slots. Click on the material Type button which should say "Standard". When the Material Map Browser appears the Multi/Sub-Object material type and click OK. You will be asked to discard or keep the the old material. Select discard and click OK. |
 |
|
|
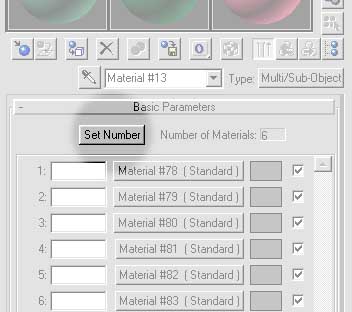
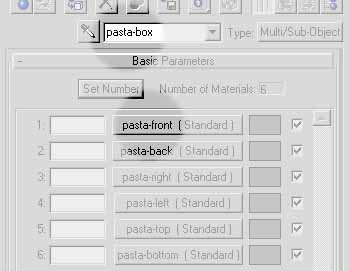
| Multi/Sub-Object Once you have specified the type of material to be a Multi/Sub-Object material you need to set the number of materials you need. For this pasta box set the material number to be six. |
 |
|
|
| Name Sub Materials In order to keep track of each sub material click on each of the material buttons and change the name of each material to be pasta-front, pasta-back, etc. Also rename the parent material to be pasta-box. NOTE: The number to the extreme left of the sub-material name is the material index number. |
 |
|
|
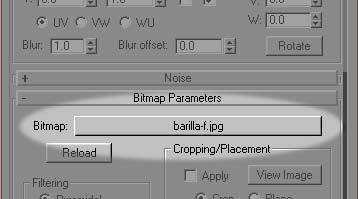
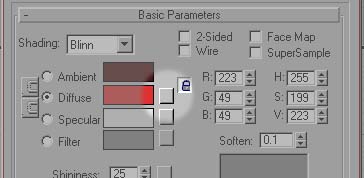
| Build Material Click on the first Sub-Material button. If you named it to match the image above, the material name will be "pasta-front". This will make the "pasta-front" material active in the Material Editor slot. Click on the small square gray button next to the Diffuse color swatch. When the Material/Map Browser opens, double click on "Bitmap". This adds a "Bitmap" map as the Diffuse color in the Material definiton. Under the Bitmap Parameters, which now show in the Material Editor, click on the long gray button next to the word "Bitmap:" A "Select Bitmap Image File" dialogue box will open. Navigate through the directory structure shown in the dialogue box and select the bitmap you want for this material. Click "Ok". The material is now defined. |
|
|
|
|
|
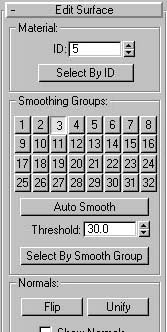
| Assign Material IDs To be able to assign a different material, and texture map, to different faces of an object you need to assign the different faces of the object a material ID. Select the box object and go to the Modify Command Panel. In the Command Panel click on the Sub-Object button under Selection Level. Set the Sub-Object Selection Level to "Face". Scroll down in the Modify Panel till you see the Edit Surface panel. The first item in the Edit Surface panel is Material ID section. Select the front face of the box in the perspective window and make sure the ID field reads "1". Select the top face and set the ID field to read "5". This assumes that you have named the fifth sub-material as "pasta-top", in the Material Editor, (see figure above). Continue selecting each face of the box and check to make sure that the Material ID matches the index number which is next to each sub-material you named in the Material Editor. When you have set the Material IDs for all the faces, return to the Material Editor and Assign the Material to the box if you havn't already done so. |
  |
|
|
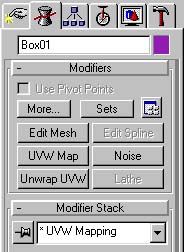
| Apply Mapping Coordinates Once you have applied the material to you box, and given all the faces the proper material IDs you can apply mapping coordinates to each face. Seclect the box, go to the Modify panel and set the Sub-Object Selection Level to Face. Select the front face of the box and then add a UVW Map Modifier to the Modifier Stack. Scroll down to the Parameters for the UVW Map modifier and set the Mapping type to "Planar". Under the Alignment section click on the "Normal Align" button and then drag your cursor over the box in the Persepctive viewport. Notice that the icon for the mapping coordinates will move from face to face as you drag over the object. When the cursor is over the front face of the box let up and then click on the "Fit" button. The texture should scale to match the face of the box. If you cannot see the texture in the graphics viewport see FAQ. When the texture is properly aligned return to the top of the Modify Command Panel and add an "Edit Mesh" modifier to the Stack. NOTE: you must add a new "Edit Mesh" modifier for each face or group of faces you want to apply unique UVW mapping coordinates to. Repeat this process for each face: select a face with an Edit Mesh modifier, then apply a UVW Map modifier for that selected face and orient the map to fit the face. |
|
|
|
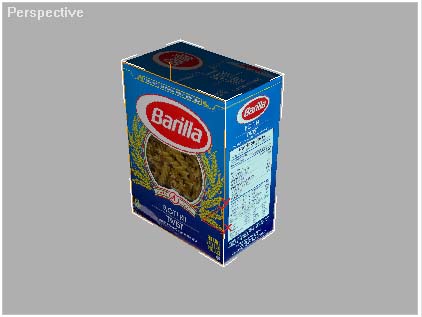
| Finished Box |
 |