Introduction
At its core, ARToolKit is a collection of software libraries, designed to be linked into application programs. For this reason, ARToolKit is distributed as sourcecode, and you must compile it on your specific operating system and platform. You will need a development environment for your operating system. Free environments are available on all platforms. Build files are also supplied to enable building on Windows in the non-free Microsoft Visual Studio platform.
Although ARToolKit offers similar functions across multiple platforms, installation differs according to your operating system. In this tutorial we will guide you through the configuration process for your specific installation.
Your machine, operating system and platform must satisfy some basic requirements. Your hardware must be able to acquire a video stream, and have spare CPU to handle the tasks of video processing and display. There are also some basic software dependencies - important to avoid compiler and linker errors. The main packages are cross-platform (e.g. OpenGL, GLUT), and others are related to the specific video library for your machine (DirectShow, V4L, QuickTime).
The software dependencies for each supported operating system are outlined below along with installation instructions.
Building
Building on Windows
Prerequisites
| Prerequisite | Instructions |
| Development environment | Microsoft Visual Studio 6 and Microsoft Visual Studio .NET 2003 are supported, but it is also possible to build the toolkit using free development environments (e.g. Cygwin, http://www.cygwin.com/) |
| DSVideoLib-0.0.8b-win32 |
On Windows, DSVideoLib is used to handle communication with the camera driver. DSVideoLib-0.0.8b or later is required for ARToolKit 2.71. A source + binary package of DSVideoLib is included on the ARToolKit downloads page on sourceforge. |
| GLUT |
Verify that GLUT runtime and SDK is installed. If not, you can download a binary package containing GLUT for Windows from http://www.xmission.com/~nate/glut.html Verify that you have the GLUT runtime installed in your system directory.
Verify that GLUT SDK is installed in your Visual C++ installation:
|
| DirectX Runtime |
Verify that DirectX runtime is installed: with Windows XP it is installed by default. You need to check your version; it must be 9.0b or later. |
| Video input device |
Plug your camera or video input into your PC and install any necessary drivers. Verify that your camera has a VFW or WDM driver by running the program amcap.exe (this can be found in the DirectX SDK, in Samples\C++\DirectShow\Bin). Check for your camera in the Devices menu (see Figure 1). 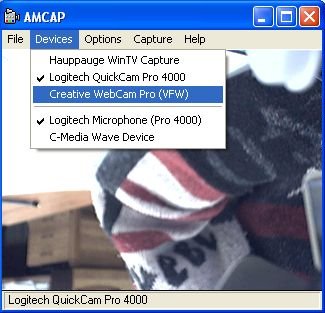 Figure 1: amcap Screenshot |
| (Optional, for VRML renderer only) OpenVRML-0.14.3-win32 | A source + binary package of OpenVRML is included on the ARToolKit downloads page on sourceforge. |
Building ARToolKit
You can now build ARToolKit. Build steps:
- Unpack the ARToolKit zip to a convenient location. This location will be referred to below as {ARToolKit}.
- Unpack the DSVideoLib zip into {ARToolKit}. Make sure that the directory is named "DSVL".
- Copy the files DSVL.dll and DSVLd.dll from {ARToolKit}\DSVL\bin into {ARToolKit}\bin.
- Install the GLUT DLL into the Windows System32 folder, and the library and headers into the VS platform SDK folders.
- Run the script {ARToolKit}\Configure.win32.bat to create include/AR/config.h.
- Open the ARToolKit.sln file (VS.NET) or ARToolkit.dsw file (VS6).
- Build the toolkit.
The VRML renderering library and example (libARvrml & simpleVRML) are optional builds:
- Unpack the OpenVRML zip into {ARToolKit}.
- Copy js32.dll from {ARToolKit}\OpenVRML\bin into {ARToolKit}\bin.
- Enable the libARvrml and simpleVRML projects in the VS configuration manager and build.
Linux / SGI Irix.
Prerequisites
| Prerequisite | Instructions |
| OpenGL and GLUT |
Verify that OpenGL and GLUT RunTimes are installed: You need to find opengl.so, glu.so, and glut.so, generally in /usr/X11R6/lib, /usr/lib, or /usr/local/lib.
Verify that OpenGL and GLUT SDKs are installed: You need to find opengl.h, glu.h and glut.h, generally in /usr/X11R6/include, /usr/include, or /usr/local/include. |
| Video Library |
Verify that your Video Library is installed:
On Linux, V4L RunTime and SDK installed, or dv1394 and dv1394 RunTime and SDK installed. On SGI, ARToolKit has only been tested with SGI O2 models, but it should work with any SGI machine with similar video input hardware. |
| (Optional, for VRML renderer only) OpenVRML-0.14.3 | A source package of OpenVRML is included on the ARToolKit downloads page on sourceforge. |
Building ARToolKit
You can now build ARToolKit. Open a console application.
Unpack the ARToolKit to a convenient location. The root of this location will be referred to below as {ARToolKit}:
tar zxvf ARToolKit-2.71.tgz
Configure and build. The Linux builds support video input using either Video4Linux, an IIDC-compliant or DV camera connected via IEEE-1394, or a Sony EyeToy camera connected via USB. You will be prompted as to which of the four Linux video drivers you wish to use at the Configure step.
cd {ARToolKit}

                    ./Configure
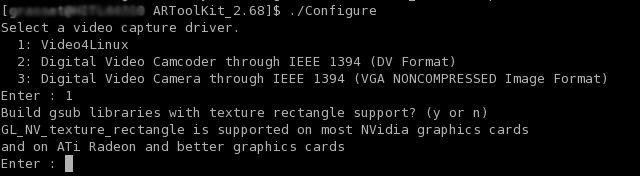
Linux Setup Screenshot
make
Following a successful build, to run a binary such as simpleTest:
cd {ARToolKit}/bin

                    ./simpleTest
The VRML renderering library and example (libARvrml & simpleVRML) are optional builds:
cd {ARToolKit}/lib/SRC/ARvrml

                    make

                    cd {ARToolKit}/examples/simpleVRML

                    make

                    cd {ARToolKit}/bin

                    ./simpleVRML
Mac OS X
Prerequisites
| Prerequisite | Instructions |
| Apple Developer Tools | XCode Tools install CD is included with Mac OS X, or disk image available free from Apple, http://developer.apple.com/tools/xcode/ |
| Camera driver | Mac OS X 10.3 and later include an inbuilt IIDC and DV FireWire camera driver. USB camera drivers (and Firewire camera drivers for pre-10.3 systems) can be obtained from ioXperts at http://www.ioxperts.com/ |
| (Optional, for VRML renderer only) Apple X11 and Fink | Install X11 off the Mac OS X install CD 3 or download an install disk image from http://www.apple.com/downloads/macosx/apple/x11formacosx.html. Download Fink (and optionally, FinkCommander) from http://fink.sourceforge.net/download/. |
Building ARToolKit
Building using the XCode IDE:
- Unpack the archive to a convenient location using StuffIt Expander, and open the ARToolKit.xcodeproj.
- Builds include a script target "Configure" which enables accelerated and rectangular texturing by default. If you wish to change these defaults, manually run the ./Configure script from Terminal as for a command-line build (below).
- Executables are built as bundled applications into ARToolKit/bin, with the Data/ directory copied into the application bundle so that they may be moved from this location to other locations.
The VRML renderering library and example (libARvrml & simpleVRML) are optional builds:
- Using FinkCommander, do a binary install of mozilla-dev, followed by an install of openvrml4-dev and openvrml-gl5-dev.
- Select the ARToolKit extensions target, and build.
Alternately, ARToolKit can be built from the Terminal, using the Unix makefiles.
Drop the ARToolKit into a convenient location, e.g. your Desktop, then open a Terminal window and type:
cd ~/Desktop

                    tar zxvf ARToolKit-2.71.tgz
Configure and build
cd ~/ARToolKit

                    ./Configure

                    make
Following a successful build, to run a binary such as simpleTest, add these commands:
cd bin

                    ./simpleTest
The VRML renderering library and example (libARvrml & simpleVRML) are optional builds:
fink -b install mozilla-dev

                    fink install openvrml4-dev openvrml-gl5-dev

                    cd ~/Desktop/ARToolKit/lib/SRC/ARvrml

                    make

                    cd ~/Desktop/ARToolKit/examples/simpleVRML

                    make

                    cd ~/Desktop/ARToolKit/bin

                    ./simpleVRML
Running the utilities and examples
Current versions of ARToolKit aren't designed to be installed in any standard location; thethe current compilation directory should be used to build your ARToolKit application. As ARToolKit builds only static libraries, these will be linked into any executable you build.

Graphics Test Screenshot
Video Test Screenshot