In each platform you have generally two choices: click on the program from your OS explorer or starting
from the command line: the last choice is better since it give you the error and standard output stream
(and ARToolKit used it a lot). Each platform offer a dialog box to setup the video before starting the
main AR loop.
Windows
On a Windows PC double click on the simple.exe icon in the bin directory from your
windows explorer. A dos console window will open and when the camera is detected the follow dialog will
open. Otherwise start the Command Prompt program from the Start Bar (In all programs->accessories->
Command Prompt on winXP, english version), go the bin directory and run simple.exe.
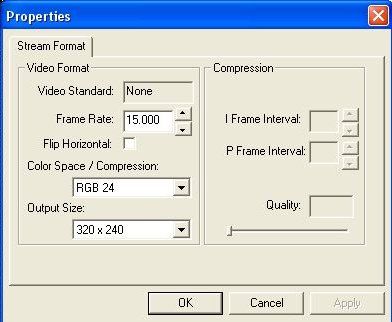
Windows Camera Config
In this video dialog you can change the output size of the video or the video format acquired from the camera.
You need to notice that better the format is similar to ARToolKit tracking format, faster is the acquisition (RGB
more efficient). In some camera driver you can also change the frame rate. By default this dialog is associate to
your first video input so you can have some problems (see the
FAQ).
Linux
On a Linux double click on the simple icon in the bin directory from your gnome or kde explorer
(notice than you will not have error or output stream display). Otherwise start a terminal, go the bin
directory and runsimple. If you have V4L this dialog will be appear (development in progress for firewire
dialog support).
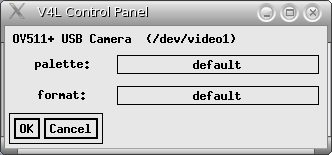
Linux Camera Config (with V4L)
In this video dialog you can change the output size of the video or the video format acquired from the camera. You
need to notice that better the format is similar to ARToolKit tracking format, faster is the acquisition (RGB more
efficient). By default this dialog is associate to your first video input so you can have some problems
(see the FAQ).
MacOS
On MacOS X double click on the simple icon in the bin directory from your mac explorer. A
console window will open and when the camera is detected the follow dialog will open. Otherwise start the Terminal
program, go the bin directory and run simple.

MacOS Camera Config
The default Mac video dialog is really advanced so you can change a lot of elements, like video input, format or
setup the video parameters (saturation, brightness). Furthermore, a preview window is displayed that help for the
configuration. You need to notice that better the format is similar to ARToolKit tracking format, faster is the
acquisition (RGB more efficient).
SGI
On SGI you need to use a terminal, go to the bin directory, and run simple.
simpleTest Output
If successful, a video window will appear on the screen (otherwise report you on the
FAQ,
mailing list information or the
documentation). When
you point the camera at the black square with HIRO printed in it you should see a virtual blue cube appear attached
to the marker. Figure 5 shows a screen snapshot of the program running. As the real marker is moved the virtual
object should move with it and appear exactly aligned with the marker.
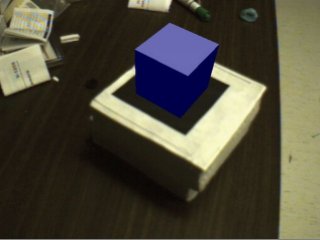
The simple program running - a virtual block aligned with a real marker
In order for the virtual object to appear the entire black square border of the marker must be in view and
also the pattern contained within the square border must be visible at all times. If the virtual image does
not appear, or it flickers in and out of view it may be because of lighting conditions. This can often be
fixed by changing the lighting threshold value used by the image processing routines. If you hit the ‘t' key
on the keyboard you will be prompted to enter a new threshold value. This should be a value between 0 and 255;
the default is 100. Hitting the ‘d' key will show the thresholded video image below the main video window.
Possible tracking patterns found in the input image are marked by a red square in the thresholded image.
This will help you check the effect of lighting and threshold values on the video input. Figure 6 shows
simple.exe with the threshold image on.
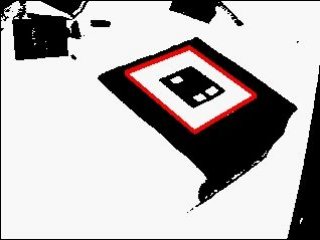
Thresholded Video Image with Identified Pattern
The ‘Esc' key quits the program and prints out frame rate information.
The simple program shows how an application based on the ARToolKit software is able to calculate the
camera viewpoint in real time and use this information to precisely overlay virtual images on a real world object.
In the next section we explain how this works.