| UI | MATHSim | MATHFlow | MS Visio | MATHView | ||||
|---|---|---|---|---|---|---|---|---|
| Execution | Simulation Engine | MATHFlow Repo Mgmt | MATHFlow macros | Gephi | ||||
| MATH<-> BPMN Translator | ||||||||
| Storage | BPMN Files | MATH Database | ||||||
| Microsoft Access | ||||||||
MATHFlow requires Windows XP, Vista, or Windows 7; and Microsoft Visio 2010.
Previous versions of Visio are not supported. Users with previous version of Visio are encouraged to upgrade to Visio 2010.
Make sure that Visio 2010 is installed before installing MATHFlow. Otherwise you may encounter an error saying that you can't install both 32-bit and 64-bit Office components at the same time. If you encounter this error, the following procedure may prove useful to you:
Your MATH models will not be affected by uninstalling and reinstalling MATHFlow.
Download the two packages http://parvac.washington.edu/nccd/download/installers/setup.msi, and http://parvac.washington.edu/nccd/download/installers/AccessDatabaseEngine.exe. As a user with administrative rights, run AccessDatabaseEngine.exe to install 32-bit Access database components. Once that has finished, run setup.msi to install MATHFlow. Do not change any of the settings during the installation, let it install in the default location and with the default settings.
Then, set Visio to enable macros by default. Start Visio, look in the File menu under Options, and click on "Trust Center". In the Trust Center dialog, select "Trust Center Settings...", and under "Macro Settings", select the "Enable all macros" setting, then click OK.
First of all, you will need to have a process repository open. There are two ways to achieve this: either open an existing repository, or create a new one.
Note that MATHFlow opens with the "Open File Repository" dialog box already open, but if you intend to create a new repository or if you have not yet created a repository to begin with, you will not be able to use that dialog.
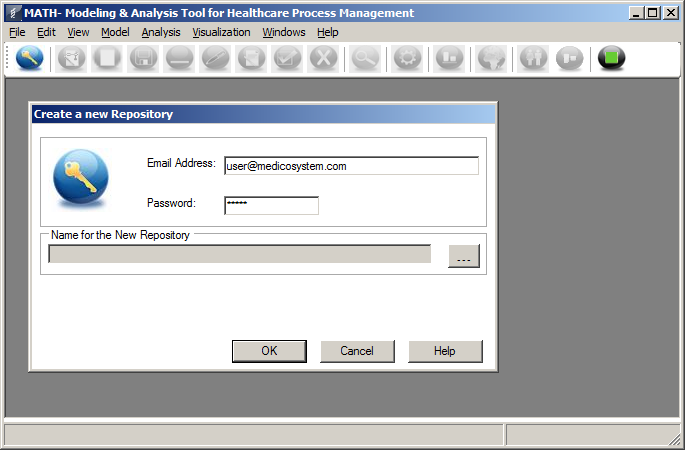
Instead, close it, and from the File menu, choose "New Process Repository". You can type in any email address you like, since the repository is not (yet) online but is stored locally. Likewise the password and DB provider fields can be left as is. Click on the "..." button and navigate to the folder in which you would like to create the database; then click OK.
It is strongly recommended that each repository live in a folder of its very own.
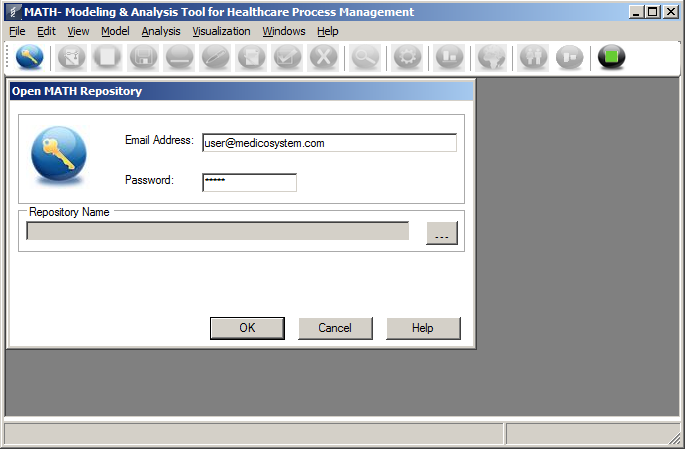
First, click on the "Globe with key" icon. Fill in your email address as above, and then click on the "..." button to choose a repository to open.
![]() Caution: While MATHFlow will allow you to open a repository that
has been created in a previous version of MATHFlow, it is unlikely
that you will be able to build a sound model this way. Please see
the instructions for bringing a model forward
to a new version, but note that this may not always work either,
depending on the two versions of MATHFlow in question.
Caution: While MATHFlow will allow you to open a repository that
has been created in a previous version of MATHFlow, it is unlikely
that you will be able to build a sound model this way. Please see
the instructions for bringing a model forward
to a new version, but note that this may not always work either,
depending on the two versions of MATHFlow in question.
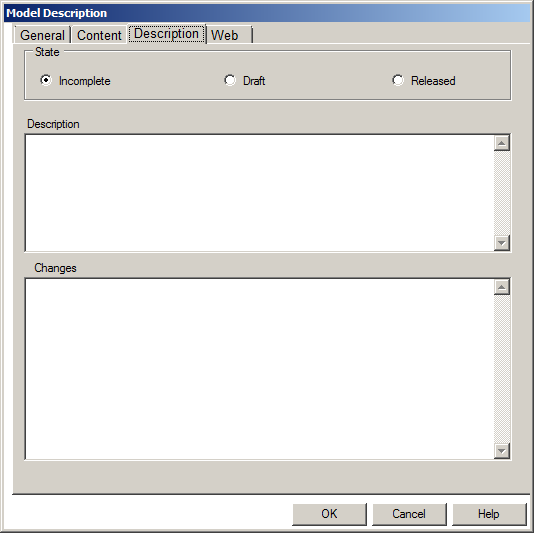
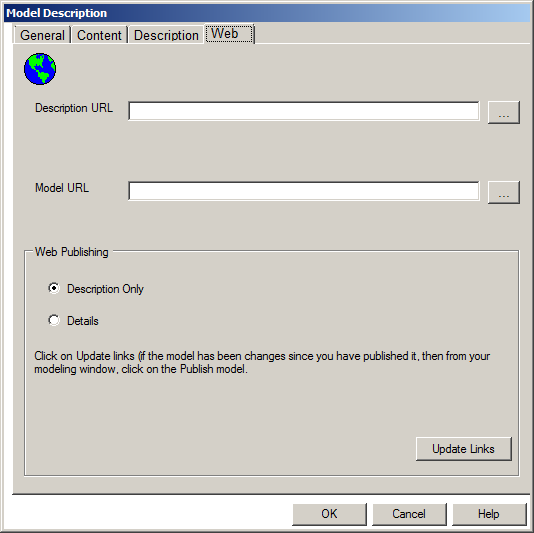
Click on the "globe with sheet of paper" icon to create a new model. This should open a dialog box where the model name can be entered, as well as other information. Make sure you fill in a name for the model you wish to create. If you have already created one or more models in the repository, their names will appear in the "Existing Models" list.
If this model will be a component that you may wish to reuse in a larger model, change the "Business Process Model Type" from "Business Process Model" to "Process Component".
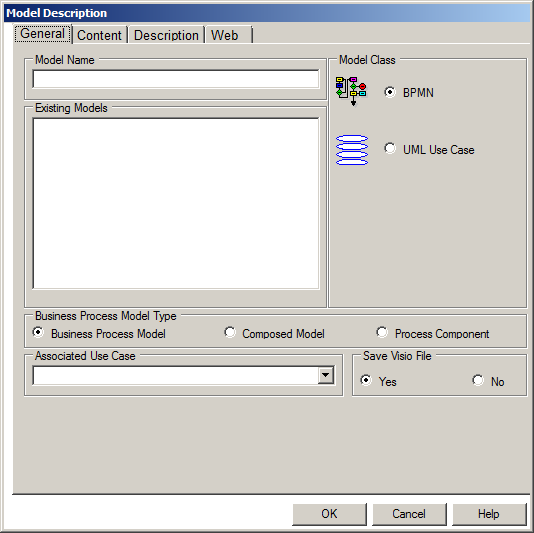
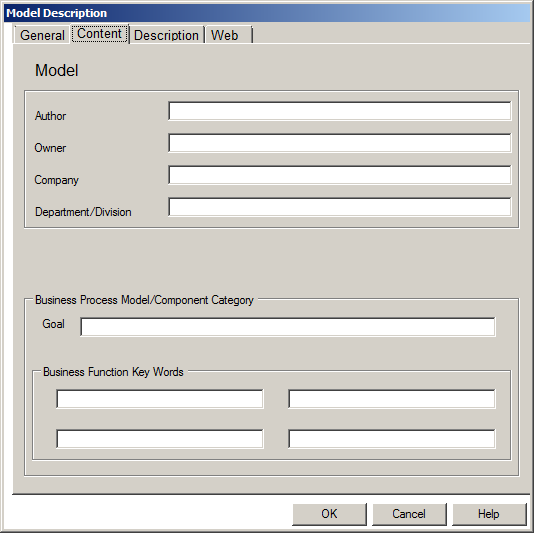
You can also enter other meta-data for the new model using this dialog; the other tabs (in addition to "General") allow you to enter author/owner information, key words, whether the model is thought to be complete, and even URLs for web publishing.
MATHFlow does not necessarily make use of all of this information: for example, it does not appear to have a "publish model to web" option.
Opening an existing model is exactly the same as creating a new one, except that the icon to click on is the "Black globe with pencil" icon; and you must choose the model you would like to open from the "Existing Models" list.
Once you have clicked OK, Visio will open. If it warns you about macros, you will have to inform Visio to load all macros, then close MATHFlow and restart; see the Appendix for details.
![]() Caution: If Visio complains about macros when opening a model, any
subsequent changes you may make to the model will be lost.
Indeed, if you create a large model after seeing this warning,
your model will be lost in its entirety!
Caution: If Visio complains about macros when opening a model, any
subsequent changes you may make to the model will be lost.
Indeed, if you create a large model after seeing this warning,
your model will be lost in its entirety!
Visio will open in its own window. Note that the Visio window may on occasion open behind the MATHFlow window; if that happens you can bring it forward using the Visio window icon that will have appeared on the task bar.
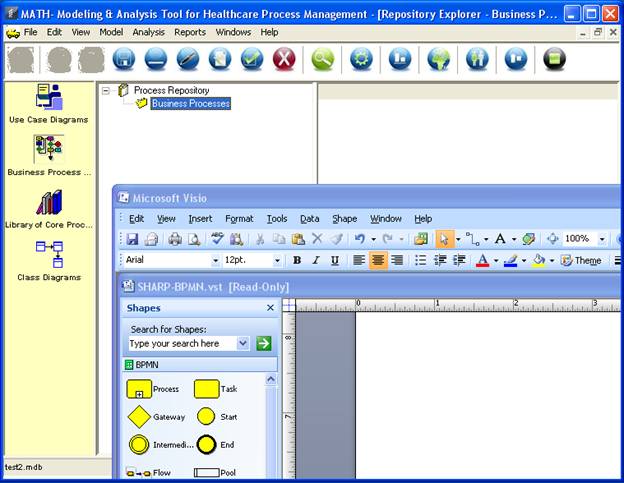
On the left hand side of the Visio window appears an accordion, or vertical stack panel, containing three categories of stencils: BPMN, Performer, and Artifact. The BPMN panel displays the basic MATH stencils, the Performer panel shows actors (human and mechanical) who could perform a task or process, and the Artifact panel information sources that are created or consulted during the course of a process.
Any of these shapes can be dragged from their respective panels onto the Visio sheet, and combined to produce BPMN process diagrams. What exactly comprises a BPMN process diagram is out of scope for this document; the unfamiliar reader is encouraged to look at the BPMN tutorial available at http://www.bpmn.org/Documents/OMG_BPMN_Tutorial.pdf or the BPMN 2.0 examples document at http://www.omg.org/cgi-bin/doc?dtc/10-06-02.pdf.
There are six basic things you can do within the captive Visio window to build a MATH model.
![]() Caution: The MATHFlow back end
does not support the use of any drawing tools aside from the stencils provided
on the three mentioned palettes. If you
use other tools within Visio to draw on the page, it may appear to work, but
in fact your model will be incomplete!
Caution: The MATHFlow back end
does not support the use of any drawing tools aside from the stencils provided
on the three mentioned palettes. If you
use other tools within Visio to draw on the page, it may appear to work, but
in fact your model will be incomplete!
Let's run through the creation of a very simple model. This model will start upon receipt of a message, a task will be performed, and depending on the results a second task might be performed; then, either way, the process is finished.
First, drag a Start node onto the sheet. You will see that a start node is created on the sheet, with the name Start1. Let's suppose you'd like this to be a message called "email start". Right-click the icon and open its properties.
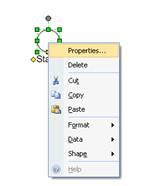
As one might expect, entering a new name in the "Name" field changes the name of the icon on the sheet. You can also change the type of start event to "Message" using the same dialog.
Similarly, you can add tasks, a gateway, and an end event by dragging the corresponding shapes from the palette at the left; and the End event can be changed into a message event and renamed in the same fashion as the Start event.
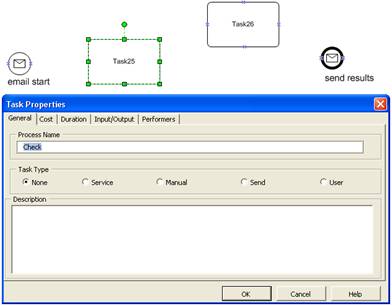
Renaming the Tasks and Gateways follows a different procedure. First, open the Task shape properties and change the task name, just as you did for the Events. You can also change other task properties here, for example, cost and duration.
Once you have named all the objects and assigned them their proper types, you can add the flows. As before, just drag Flow objects from the palette on the left. When either end of a Flow object touches any of the blue X-shaped anchors on any of the Task, Process, Gateway, or Event objects, it will turn red and "snap" into place. If you continue to drag the Flow icon past that point, it will unsnap, but if you release it in that position, it will become anchored to the shape at that point. You can then drag the other end to another anchor on another shape to connect the two shapes.
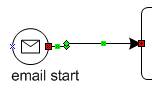
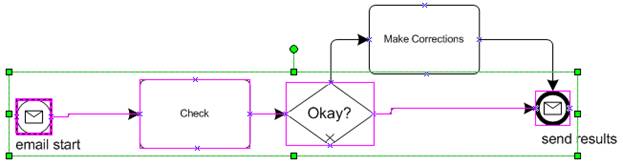
If both endpoints are not red when the Flow object is selected, as shown in the figure, it is not really connected. Once it is connected, though, the objects to which it is connected may be moved freely around the page and the connections will be maintained.
![]() Caution: When connecting flows, you must connect the flow to
one of the anchor connectors on the object's perimeter, NOT to the
center of the object. Connecting the flow to the center of the
object causes the flow to remain unconnected in the
database.
Caution: When connecting flows, you must connect the flow to
one of the anchor connectors on the object's perimeter, NOT to the
center of the object. Connecting the flow to the center of the
object causes the flow to remain unconnected in the
database.
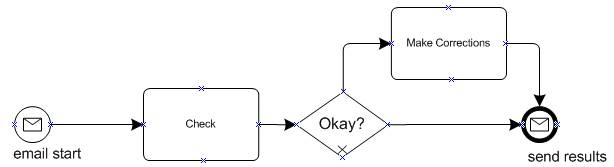
Now you should have a model that looks something like the following:
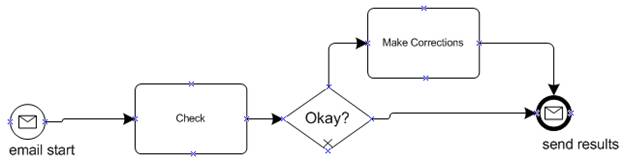
This model is schematically correct, and that's all that the MATH database cares about. It is, however, a bit ugly. We can't change the look of the stencils, but something can be done about the alignment and distribution of the shapes, and the flows can be straightened out.
First, select all four objects on the bottom row (everything except "Make Corrections").
Then open up the Alignment menu and select vertical center alignment (the center option in the bottom row):

After correcting the alignment, the diagram looks much more like what you might like it to look like:
Often, for even moderately complex processes, it is convenient to describe them on several separate pages. In MATHFlow, we create these extra pages simply by adding Process objects to the sheet.
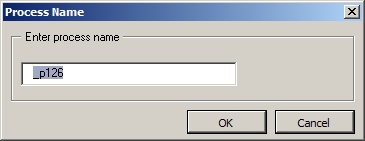
The processes will automatically be given placeholder names beginning with _p, for example, _p126. In order to enter one of these processes to populate it, right-click on the Process shape and select "Drill down...".
You will be asked to name the process. Although MATHFlow gives the impression of being able to rename processes, this is not in fact the case, so be sure to type in the correct name at this point.
![]() Caution: MATHFlow appears to allow you to rename
subprocesses by going into their properties. Do not do this, or
your model will become corrupted.
Caution: MATHFlow appears to allow you to rename
subprocesses by going into their properties. Do not do this, or
your model will become corrupted.
To return to the top-level process, you can double-click on the tan-colored process title at the top of the page.
You can also, if you like, click on the tabs at the bottom of the window to jump between process contexts.
![]() Caution: It is not actually possible to refer to a reusable
process component within MATHFlow. The paragraph below describes
the desired behavior, which was partially implemented in an earlier
version of MATHFlow.
Caution: It is not actually possible to refer to a reusable
process component within MATHFlow. The paragraph below describes
the desired behavior, which was partially implemented in an earlier
version of MATHFlow.
To refer to a process component that you have created earlier, create a subprocess object; but then, instead of double-clicking on the new subprocess to add stencils to it, right-click on the subprocess icon and select "Insert Process Instance from Repository". You will be prompted to select which of your Reusable Process Components should be substituted into the subprocess at that point.
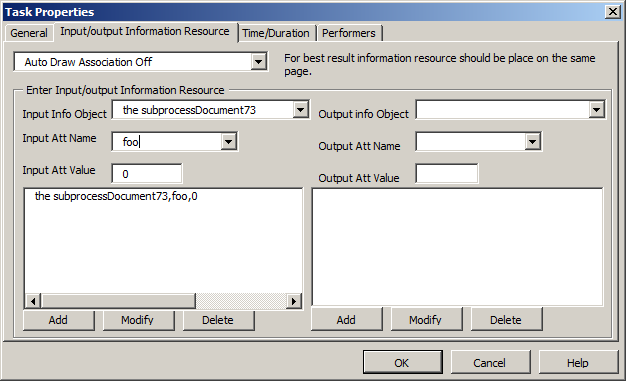
One of the main purposes of MATHFlow is to describe what information is required to perform each task, and from what resources that information is drawn. Information resource stencils are located in the "Information Resource Artifacts" panel on the left of the Visio window. As with the flow stencils, simply drag these onto the sheet to create an information resource object.
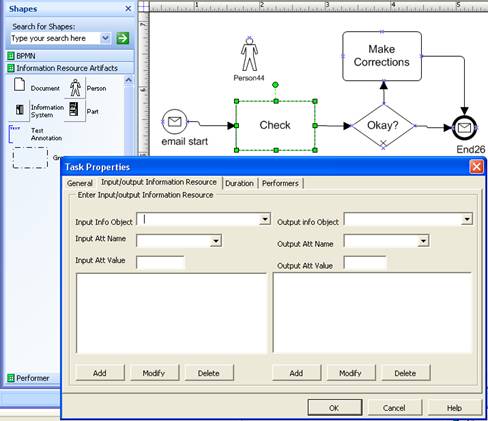
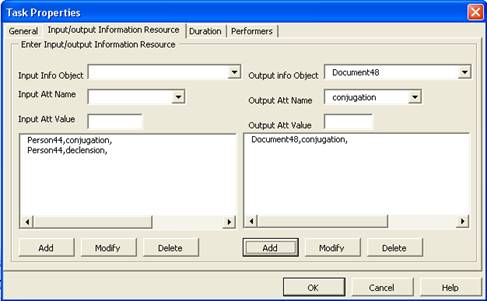
To refer to an information resource within a task, right-click on the task and select "Properties". Under the "Input/output Information Resource" tab you can select from the list of information resources present in the model. In the figure, I've added a "person" information resource called Person44; this person will give whoever does the "Check" task the information required to perform that task. Let's suppose that we want to ask for two pieces of information from Person44: conjugation and declension. After selecting Person44 in the "Input Info Object" drop-down box, we check the "Input Name" box to see if our conjugation and declension attributes are present. In this case they aren't, so we simply type them in. If we know what value Person44 will assign to these attributes, that value can also be entered in the "Input Att Value" box. Once these three fields are filled in, press "Add" to add them to the list of inputs for that task. In a similar way, we can add data that are produced (or modified) by the task, and assign those attributes to other information resources that we regard as the outputs of the task.
In simulation, the expressions entered in the "Att Value" fields are evaluated as arithmetic expressions. Using this feature, it is possible to refer to other information attributes when setting values. The syntax for referring to an attribute of an information resource is
InformationResourceName.attributeName
To increment a counter, for example, that resides in an attribute called counter in an information resource called Resource, you would specify
The simulator will interpret this as equivalent to the statement
Resource.counter := Resource.counter + 1
![]() Caution: MATHFlow does not attempt to check the validity of the
expression written in the "Att Value" field. Because of this, it is
easy to write an expression that cannot be evaluated at all, or
which refers to information resources or attribute names that are
undefined.
Caution: MATHFlow does not attempt to check the validity of the
expression written in the "Att Value" field. Because of this, it is
easy to write an expression that cannot be evaluated at all, or
which refers to information resources or attribute names that are
undefined.
It is possible to type into the "Input Info Object" and "Output Info Object" fields, creating information resources in the database "on the fly", without using the corresponding stencils. It is not clear, however, what the object type of such a resource would be (e.g., whether it is a Person or an Information System).
It is recommended that both information resource object names and attribute names should be valid "identifier names", that is, they should
Information resources and attributes whose names are not valid identifier names cannot be used in MATHSim for expressions, and do not produce valid Java classes from MATHView.
It is possible to add Text Annotation and Association objects to the diagram, but these are only cosmetic; they do not change the underlying model.
Once you are satisfied with your process model, you can save it. Click on the "Globe with floppy disk" icon on the MATHFlow toolbar to save the process model, and then click on the "Globe with underline" icon to close the model and return to the repository viewer.
If you would like to save the model under a different name, you can use the Save As Model... entry in the File menu; you can also export the model to a BPMN-2 XML representation using the Export BPMN2 option from the File menu.
![]() Caution: The "Save as" function of Visio will not save the
model under a different name in MATHFlow, or indeed save the model
in MATHFlow at all. To save the model, you should use the MATHFlow
controls exclusively.
Caution: The "Save as" function of Visio will not save the
model under a different name in MATHFlow, or indeed save the model
in MATHFlow at all. To save the model, you should use the MATHFlow
controls exclusively.
![]() Caution: If you quit Visio by closing its window, MATHFlow
will subsequently crash and/or its database will become corrupted.
Instead, use the "Globe with underline" icon exclusively.
Caution: If you quit Visio by closing its window, MATHFlow
will subsequently crash and/or its database will become corrupted.
Instead, use the "Globe with underline" icon exclusively.
Once the model is saved, it will appear in the "Process Repository" hierarchy. You can reopen the model either by using the "Open Model" procedure described above, or by double-clicking on its name in the "Process Repository" hierarchy.
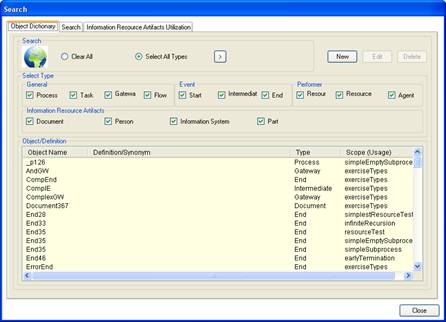
One of the main purposes of the MATHFlow tool is to analyze the use of information resources in process models. To this end, MATHFlow generates an Information Dictionary containing all the objects in each model, and which objects make use of what resources.
The information dictionary can be accessed through the Find and Process Information Dictionary entries of the Edit menu, and through the Information Resource Artifacts Utilization entry in the Analysis menu. The object dictionary tab, shown below, catalogues all of the objects in the database by name, and describes their type and what model they are a part of.
The Search tab allows you to search for an object by name: to search for all Information Resource objects that begin with "Info", type "Info*" into the search box and click on the "Search" button.
![]() Caution: It is not possible at present to search based on the
"Definition/Synonym" field, or on an object name
that contains a given string. For example, if there is an
Information Resource called "Information System42" containing
definitions "foo" and "bar", searching on "foo" or "*System*" will
not have the desired effect.
Caution: It is not possible at present to search based on the
"Definition/Synonym" field, or on an object name
that contains a given string. For example, if there is an
Information Resource called "Information System42" containing
definitions "foo" and "bar", searching on "foo" or "*System*" will
not have the desired effect.
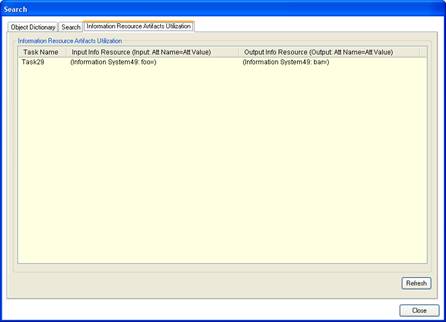
The third tab displays the information utilization by task: both inputs and outputs are shown.
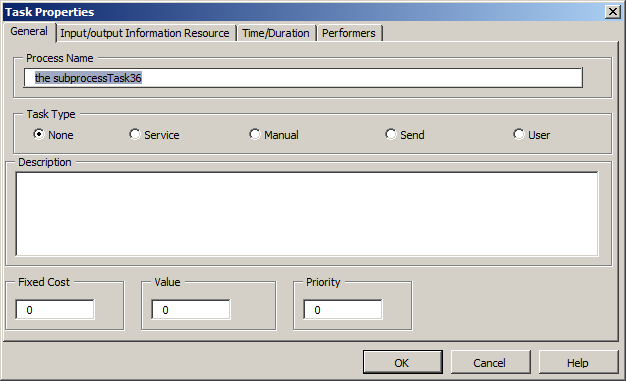
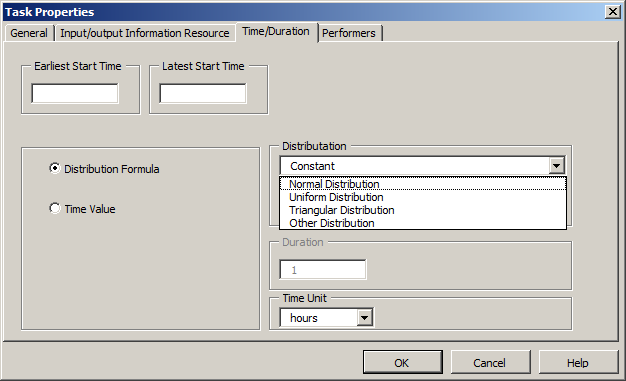
Before running a simulation, it will be necessary to adjust the parameters of all of the objects in the model. This is done by changing the object properties, available through the right-click context menu. Each type of object has different properties.
The meat of the simulation information is contained in the Task, Sequence Flow, and Gateway objects.

The "General" tab allows you to set the task's cost (as a constant only). The other parameters, including Task Type, are not used by MATHSim.
Under "Duration", the task's duration can be expressed, either as a constant ("Time Value") or as a statistical distribution. If one of the named distributions is selected, the parameters will take their values from the blanks in the dialog. If, however, "Other Distribution" is selected, you may type in a raw format distribution string to be consumed by MATHSim as is.
At the time of this writing, the format is: the name of a
distribution, followed by a slash ("/"), followed by a
slash-separated sequence of parameters. The names of the available
distributions, and the meaning and order of the parameters, are as
in MATHSim's Simulation Properties dialog. For example,
for a Weibull distribution, the parameters
are scale, shape, and offset, in that
order; and the string to specify a Weibull distribution
with scale=100, shape=1.5, and offset=10
would be weibull/100/1.5/10
. Note that, since
MATHSim interprets these raw format strings as is, all time
parameters in this raw format are interpreted as seconds,
regardless of the time units specified in the Task Properties
dialog.
The Earliest Start Time and Latest Start Time parameters are not used by MATHSim.
Under "Information Resources", you can specify where the information required by this task comes from, and where the information produced by this task is stored. The Input Info Object pull-down menu allows you to choose any of the information objects anywhere in the model. The Input Att Name allows you to choose from among the variables you have already defined, or you may type in a new variable name of your choice. Finally, if starting this task will cause a state change in the model that will affect other parallel activities, you may assign a predefined value using the Input Att Value field. Select Add to add one of these triplets to the list.
The output information resources function similarly.
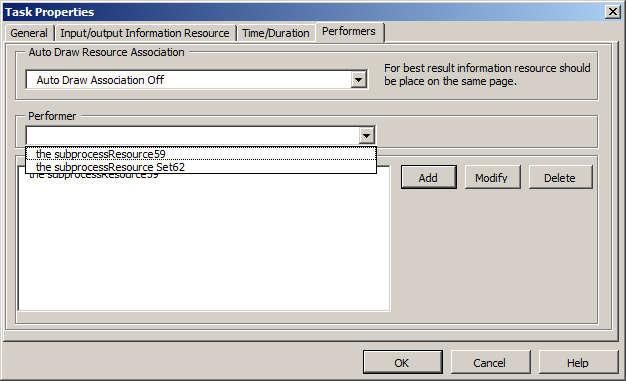
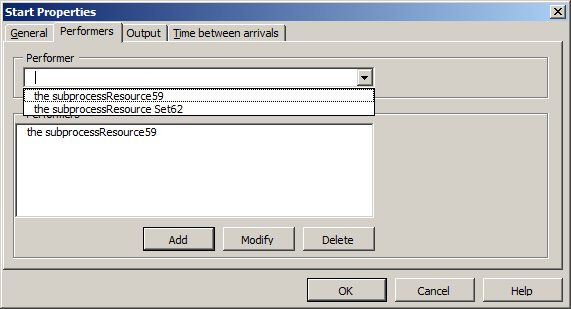
Finally, the "Performers" tab allows you to specify which of the available performers can perform this task. If multiple performers are listed, then any of them can perform the task.
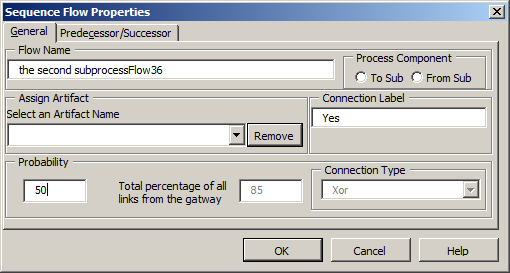
The sequence flow properties dialog tabs are shown below. The Probability value is used by MATHSim to determine which flow to choose coming out of a gateway. The Flow Name property is useful to know when referring to this flow from a complex gateway (see below). The other parameters, including all the parameters in the "Predecessor/Successor" tab, are not used.

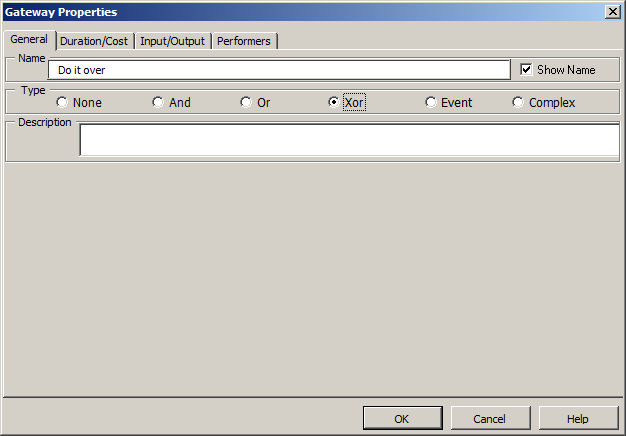
The gateway Type, displayed in the "General" tab of the Gateway properties, controls the semantics of the gateway. For descriptions of the behavior of most of the gateway types, the user is referred to the BPMN standards site, at http://www.omg.org/spec/BPMN/2.0/ (pp. 434 ff.).
MATH's implementation of Complex gateways, however, differs from the BPMN standard, since the standard does not share MATH's concept of information resources.
The standard behavior would be to hold inbound tokens until enough tokens were present to invoke the gateway (similar to an And merge gateway, only not all input flows need have a token present to invoke); and then start one or more tokens on the outbound flows, similar to an Or gateway.
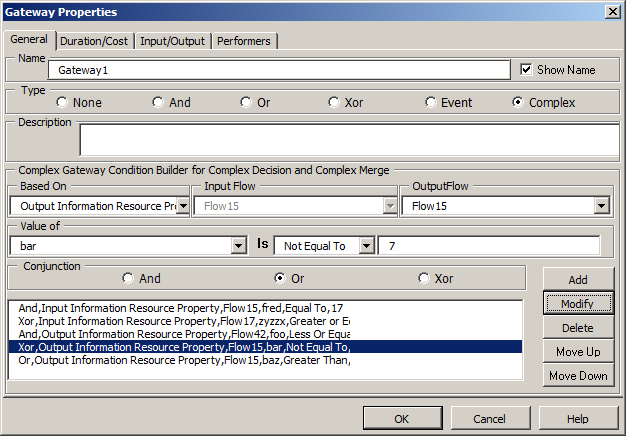
MATH's interpretation of Complex gateways is that, when a token enters a complex gateway, the values of the various information attributes are consulted, using a boolean expression. If the expression evaluates to true, then a similar expression is evaluated on each of the output flows to determine whether a token is started there, or not.
If you select a Type of Complex in the properties dialog, the condition builder dialog will appear.
The use of the condition builder is as follows:
Once several expressions have been entered, they can be rearranged using the Move Up and Move Down buttons, deleted with the Delete button, or modified.
To modify an existing clause, select it; you will see the values in the condition builder change to match the clause you have selected. Adjust the clause as desired, and press Modify; the values you have set will replace the selected values.
At the end of this process, you will see a series of clauses in the lower window that will resemble the figure above. Note that these expressions may be cut off on the right, so you may have to click through them to see what values are being compared against.
The expressions shown in the figure above are:
And,Input Information Resource Property,Flow15,fred,Equal To,17
Xor,Input Information Resource Property,Flow17,zyzzx,Greater or Equal To,19
And,Output Information Resource Property,Flow42,foo,Less Or Equal To,0.001
Xor,Output Information Resource Property,Flow42,bar,Not Equal To,7
Or,Output Information Resource Property,Flow43,baz,Greater Than,0
If separated out by input and output flows, and converted to standard boolean symbols, we can see the following conditions for entry into the complex gateway:
and for exiting on each of the flows:
Note that the first conjunction in each full expression is ignored (a boolean expression that begins with a conjunction is not well-formed).
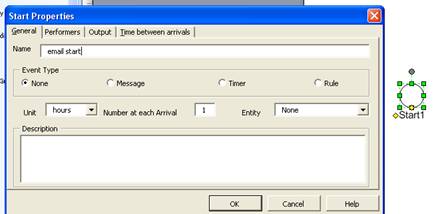
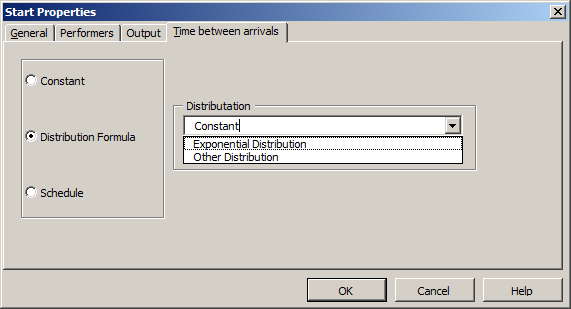
The properties sheets for Start Event objects are shown below. The most useful property of Start Event objects is Time between arrivals. This can be set to a constant value or to a statistical distribution. If the value is set on the main Start Event object on Page-1, MATHSim will default to the specified distribution for starting tokens (see the MATHSim documentation for details). Do not select "Schedule".
![]() Caution: the units to which the distribution refers are not on
this tab, but in the "General" tab. The default is Hours.
Caution: the units to which the distribution refers are not on
this tab, but in the "General" tab. The default is Hours.
As with Task durations, the time between start events can also be set as "Other Distribution", allowing you to type in a raw string, which MATHSim will interpret as random variable in seconds, regardless of the units specified on the "General" tab. See Task above for the format of this type of distribution description.
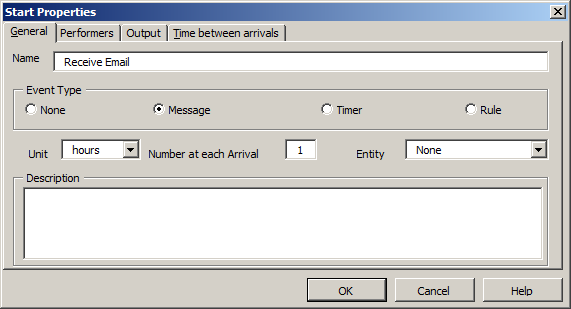
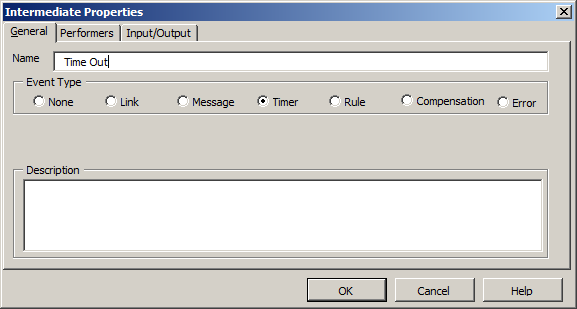
In the "General" tab, in addition to the time units, you can select what type of start event this is: blank ("None"), Message, Timer, or Rule; this will change the appearance of the shape in the diagram, as well as its behavior under simulation.
The information in the other three tabs is not used by the simulator. (MATHSim uses Performers only for Task objects, although MATHFlow will allow them to be assigned to several other types of objects, including Start Events.)
Intermediate Events likewise can be differentiated into several types, using the "General" properties tab. The other tabs are similar to that of the Start Event object.
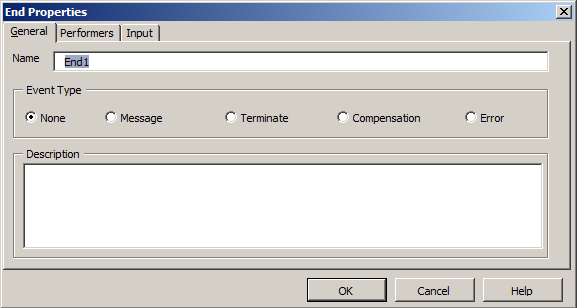
Like Start and Intermediate Event objects, the End Event object can be assigned a type.
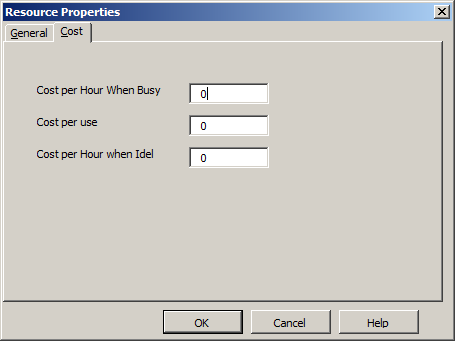
Resource parameters control the cost of resources: per use, per hour of use, and per hour idle. In addition, a capacity may be specified, which indicates the number of units of this resource available for use.
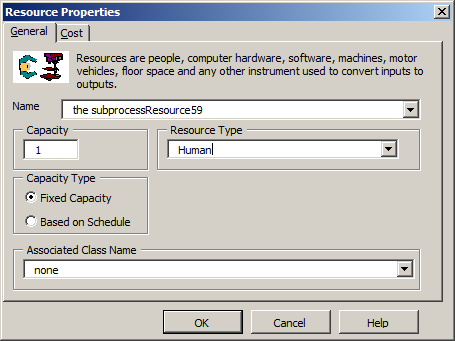

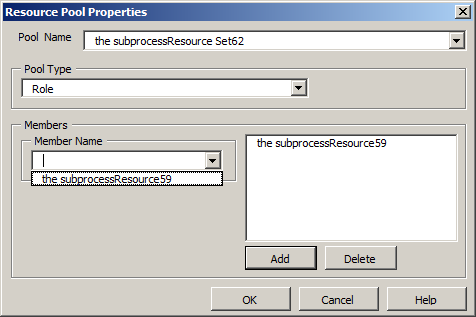
Resource Pools refer to a collection of one or more Resource objects, each of which can satisfy a given demand. For example, if an employee or a manager could both operate a point-of-sale machine, we might define a Resource Pool containing members Employee and Manager.
It is important to differentiate between this case and the case of multiple capacity. If only managers can operate the machine, for example, but there are seven managers available, we would not create a Resource Pool, but instead create a Resource object with capacity=7.
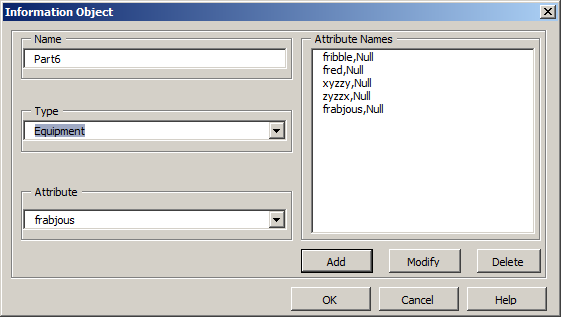
Information Object properties include the names of the attributes that can be referenced from Task objects, or Complex Gateways. New attributes can be added by typing a new name into the Attribute blank and pressing Add.
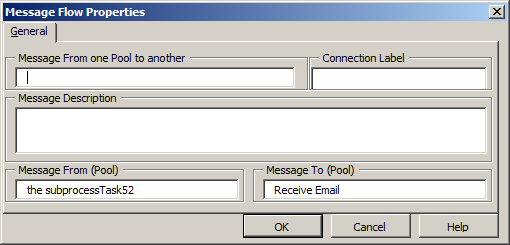
The message flow properties dialog is shown below. MATHSim uses none of the information from this dialog.
To run a simulation, press the "globe with green gear" button, or select Simulation from the Analysis menu.
For more information about running a simulation, the user is referred to the simulator manual.
To close the repository, choose "Close Process Repository" from the File menu.
To exit MATHFlow, click on the "Black globe with green square" icon on the right side of the MATHFlow toolbar. It should not be necessary to close an open model or to close an open repository before exiting.
Chances are that sooner or later, you will experience some form of model corruption while using MATHFlow. Because the Visio display and the MATH database are stored independently, however, it is conceivable that they contain different information; so the corruption may not be apparent from looking at the model through MATHFlow's Visio interface.
If you begin to suspect that your model may be corrupted (e.g., because of discrepancies between the MATHSim display and the MATHFlow display of the same model, or because the Information Dictionary display seems too small), you can use the following procedure to synchronize the model that you see with the model as it exists in the database, so that you can tell whether or how much the model is in fact corrupted.
Once this procedure is complete, the model as displayed to you should be equivalent to what is actually stored in the database. If the Visio display that results is blank, see the Defaulting to Enable Macros in Visio section of the Appendix.
The above procedure may also be useful in transferring models between different versions of MATHFlow. This is not guaranteed to work between any two given versions of MATHFlow, however, so please contact a support representative before attempting to use this procedure for that purpose.
Every time MATHFlow opens a model in Visio, you will get the "Macros are dangerous" warning, until you disable it. Think about whether you want to disable the warning: macros are dangerous, and if you use Visio for any other purpose besides MATHFlow, you may be opening yourself up to infection by Visio macro viruses.
On the other hand, MATHFlow cannot build a model without macros being enabled, at least for MATHFlow model documents. If you attempt to use MATHFlow to build a model without first enabling macros, you are wasting your time.
If you decide to enable macros by default, this is how you would do it. Once Visio is started, look in the File menu under Options, and click on "Trust Center". In the Trust Center dialog, select "Macro Settings" and select the "Enable all macros" setting, then click OK. In earlier versions of Visio, the Trust Center is available from the Tools menu.
MATH's models are contained in an Access database, the format of which is (partially) documented in the MATH Database Schema document.